With the official release of Oracle 23ai to Exadata on-prem, it is now possible to manually upgrade Grid Infrastructure (GI) from 19c to 23ai. Nowadays the process is simpler than it was in the past, and I already published several examples of how to do this:
- Upgrading to GI 23ai at ExaCC using CLI
- Upgrading to GI 23ai at ExaCC
- 21c, Zero-Downtime Oracle Grid Infrastructure Patching – Silent Mode
- 21c, Zero-Downtime Oracle Grid Infrastructure Patching
- 21c Grid Infrastructure Upgrade
- 19c Grid Infrastructure Upgrade
- Reaching Exadata 18c (this includes upgrades of GI from 12.1 to 12.2, and also from 12.2 to 18c)
So, several examples that you can use as a guide to reach from GI 12.1 to 19c. In this post, I will upgrade from GI 19.23 (19.23.0.0.240416) to GI 23.5 (23.5.0.24.07).

Planning
I recommend that the first step is planning what you need to do, and check all the needed steps. If possible (and exists) read the documentation, and meet all the requirements. While I write this post there is no official MOS note that shows how to upgrade the GI from 19c to 23ai, but we can use the note 19c Grid Infrastructure and Database Upgrade steps for Exadata Database Machine running on Oracle Linux (Doc ID 2542082.1) as a start point, and use the chapter 11 from the 23ai official doc for Grid Infrastructure Installation and Upgrade Guide for Linux.
Here the focus is to show the upgrade in the Exadata environment, but it is important to understand that Oracle 23ai requires OEL 8 and it is the same for GI. For GI it is more important if you (when the on-prem will be released) have the correct kernel version for ACFS and AFD. So, please read the MOS note ACFS and AFD Support On OS Platforms (Certification Matrix). (Doc ID 1369107.1), and for Exadata, the Exadata Database Machine and Exadata Storage Server Supported Versions (Doc ID 888828.1).
For Exadata, the OEL 8 was introduced with version 23.1 released in March of 2023, and I already explained how to patch and use it:
- Exadata version 23.1.0.0.0 – Part 01
- Exadata version 23.1.0.0.0 – Part 02
- Exadata version 23.1.0.0.0 – Part 03
- Exadata version 23.1.0.0.0 – Part 04
But, independently of where you are running the GI, the compatible.rdbms parameter needs to be set for 19.0.0.0. The GI 23ai does not support any version older than 19c. I already explained how to fix this in my previous post for ExaCC.
I executed the steps for this post over a test environment, so, maybe it will not use the same version that you have running on your system. I tried to use a simple environment, with just one 19c database running and two node RAC. If you face some issues, missing requirements, or have doubts I RECOMMEND/INSIST that you open one SR with Oracle Support to clean everything to allow you to continue the procedure in a perfect environment. One good practice is always to use the latest version of GI 19c, this will reduce the number of bugs that you (maybe) will face.
Download the Binaries
To download the binaries for GI you need to access the Oracle Software Delivery Cloud (https://edelivery.oracle.com/) and search for the package name “Oracle Database 23.5 Exadata” (to facilitate, select category “Download Package”):
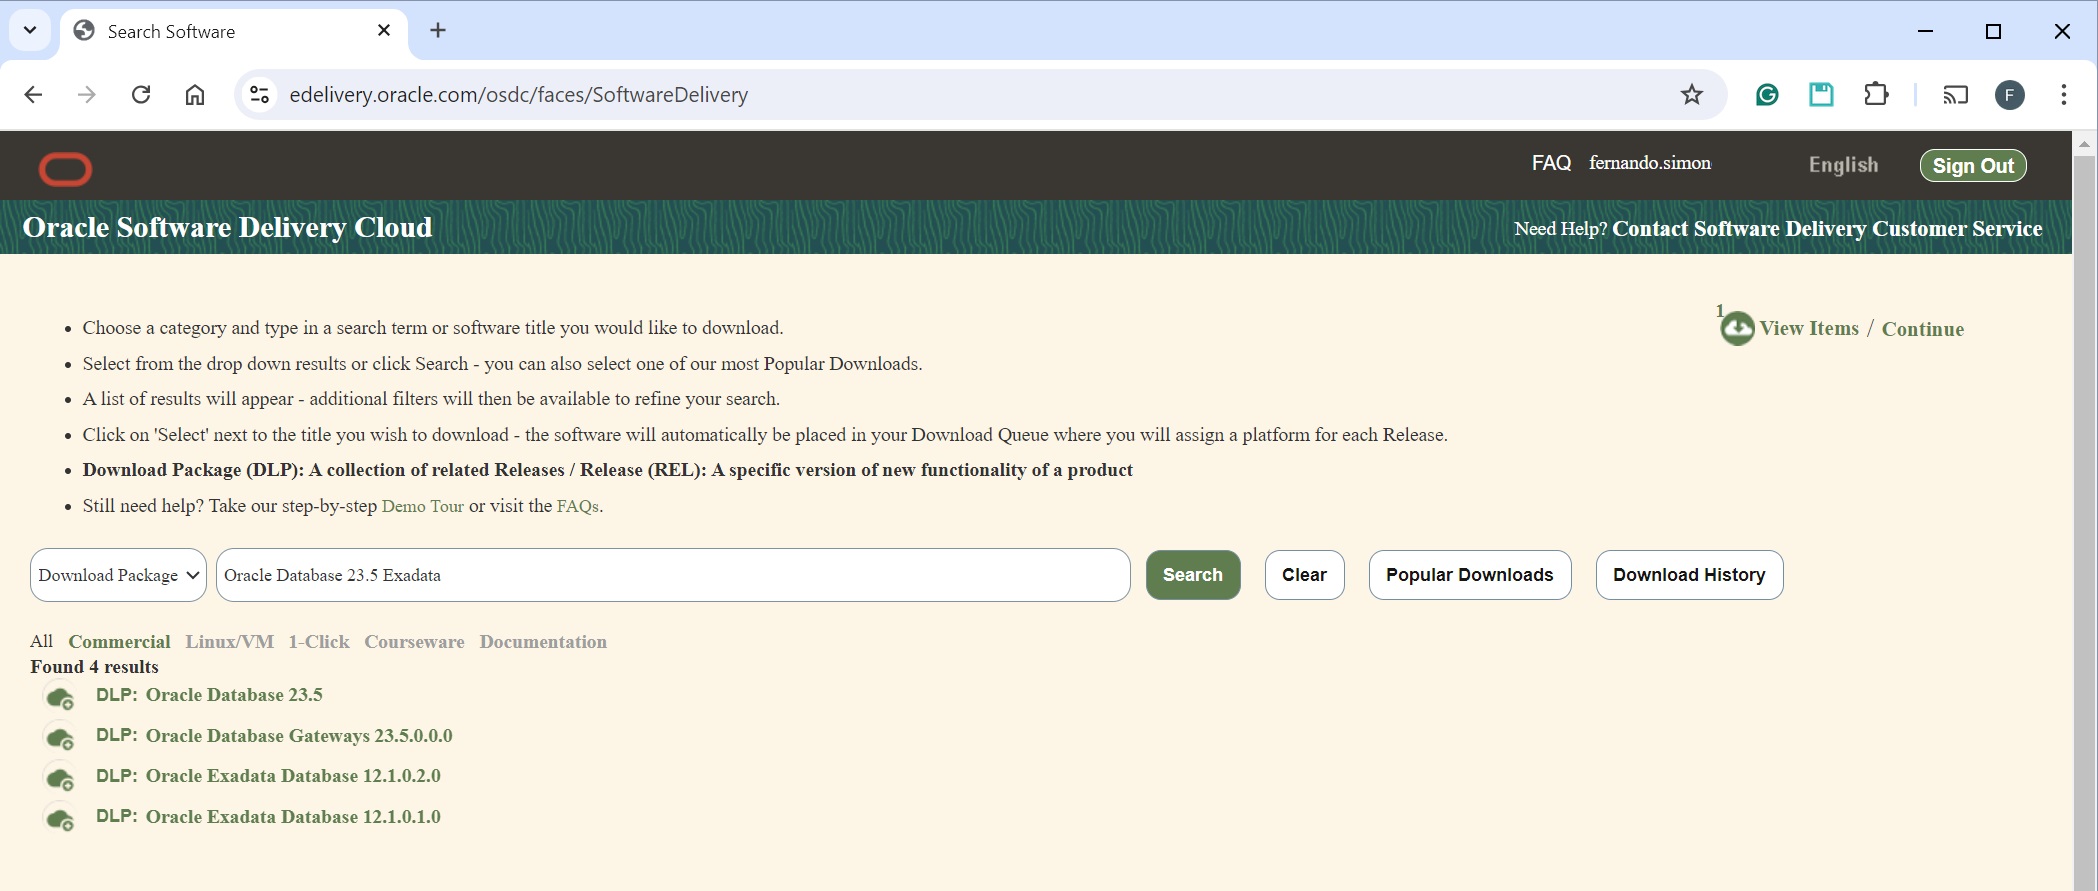
After that, you just select “Oracle Database 23.5”, and click “Continue” in the top menu to reach the next page:
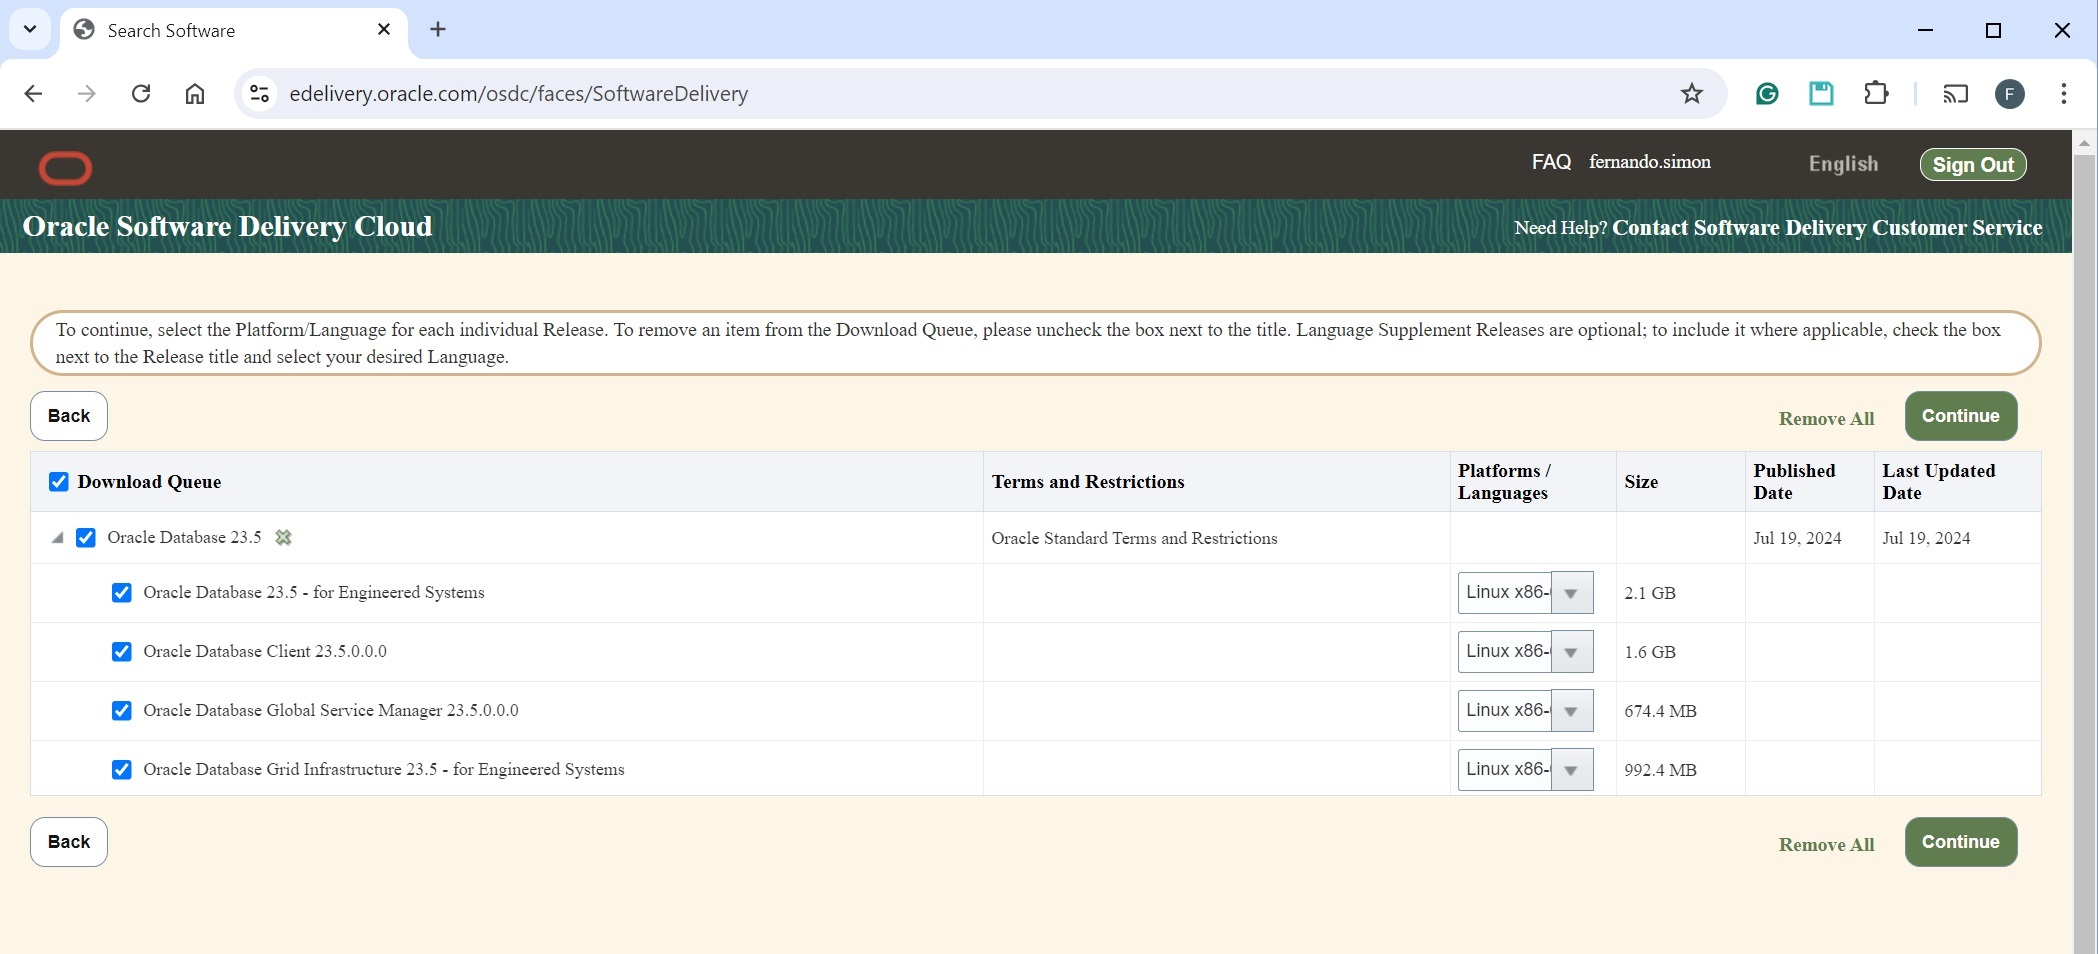
To finish and reach the download link, just select “Oracle Database Grid Infrastructure 23.5 – for Engineered Systems for Linux x86-64”, click continue (accept the Agreement), and you will have the link to V1043786-01.zip.
If you try to use this version in a non-Engineered System, you will receive this message: “ORA-27350: This version of the Oracle Database software cannot be run on this platform”.
Create Directories
So, the first step is creating the directories for your new Oracle Home for the GI. Here I executed this (as root user) in each node:
[root@o23c1n1s2 ~]#
[root@o23c1n1s2 ~]# mkdir -p /u01/app/23.5.0.0/grid
[root@o23c1n1s2 ~]# chown grid /u01/app/23.5.0.0/grid
[root@o23c1n1s2 ~]# chgrp -R oinstall /u01/app/23.5.0.0/grid
[root@o23c1n1s2 ~]#

####################################
#
# Second NODE
#
####################################
[root@o23c1n2s2 ~]#
[root@o23c1n2s2 ~]# mkdir -p /u01/app/23.5.0.0/grid
[root@o23c1n2s2 ~]# chown grid /u01/app/23.5.0.0/grid
[root@o23c1n2s2 ~]# chgrp -R oinstall /u01/app/23.5.0.0/grid
[root@o23c1n2s2 ~]#
Unzip GI:
After that, we can, only in the first node, unzip (as grid user) the binaries that were downloaded:
[root@o23c1n1s2 ~]# su - grid
[grid@o23c1n1s2 ~]$
[grid@o23c1n1s2 ~]$ unzip -q /u01/install/V1043786-01.zip -d /u01/app/23.5.0.0/grid
[grid@o23c1n1s2 ~]$
runcluvfy.sh
After, as a grid user, go to the path that binary was unzipped and call the runcluvfy.sh with parameters “stage -pre crsinst -upgrade -rolling”. This will inform it to run the stage with checks for preinstall the CRS installation, check for upgrade requirements, and in rolling mode (one node will patch/upgrade each time). It is one of the most complete checks because will verify several details in the system, from OS, the current GI, and running databases/services (in case some of them). Make attention to the other parameters that inform the source and target paths, and the versions as well.
The full command is (the output was cropped because is a long output:
[grid@o23c1n1s2 ~]$ cd /u01/app/23.5.0.0/grid/
[grid@o23c1n1s2 grid]$
[grid@o23c1n1s2 grid]$
[grid@o23c1n1s2 grid]$ ./runcluvfy.sh stage -pre crsinst -upgrade -rolling -src_crshome /u01/app/19.23.0.0/grid -dest_crshome /u01/app/23.5.0.0/grid -dest_version 23.5.0.0.0 -fixup -verbose

Initializing ...

Performing following verification checks ...
...
  ASM server parameter file and password file configuration. ...PASSED
  Check incorrectly sized ASM Disks ...PASSED
  ASM disk discovery string check ...PASSED
  ASM disk group free space ...PASSED
  correctness of ASM disk group files ownership ...PASSED
  selectivity of ASM discovery string ...PASSED
...
CVU operation performed:      stage -pre crsinst
Date:                         Jul 26, 2024, 8:52:23 PM
CVU version:                  Standalone 23.5.0.24.7 (070324x8664)
Clusterware version:          19.0.0.0.0
CVU home:                     /u01/app/23.5.0.0/grid
Grid home:                    /u01/app/19.23.0.0/grid
User:                         grid
...
[grid@o23c1n1s2 grid]$
In case you for errors, at the end it will inform you what needs to be fixed. By example:
Disk group RDBMS compatibility setting ...FAILED
DATA: PRVE-3180 : RDBMS compatibility for ASM disk group "DATA" is set to
      "11.2.0.0.0", which is less than the minimum supported value "19.0.0.0.0".

RECO: PRVE-3180 : RDBMS compatibility for ASM disk group "RECO" is set to
      "11.2.0.0.0", which is less than the minimum supported value "19.0.0.0.0".
Again, for any additional error, please open SR with the Oracle Exadata Team.
gridSetup.sh
If everything is fine, and there is no error listed, we can call the GUI of the installer/setup. Before doing that, I recommend unsetting the ORACLE_HOME, ORABLE_BASE, and ORACLE_SID variables. Is a simple call:
[grid@o23c1n1s2 ~]$ unset ORACLE_HOME
[grid@o23c1n1s2 ~]$ unset ORACLE_BASE
[grid@o23c1n1s2 ~]$ unset ORACLE_SID
[grid@o23c1n1s2 ~]$
[grid@o23c1n1s2 ~]$ cd /u01/app/23.5.0.0/grid
[grid@o23c1n1s2 grid]$ ./gridSetup.sh
The GUI will appear and basically is a Next/Next/Finish, you can see this in the gallery:
You will reach the moment to execute the rootupgrade.sh in both nodes:
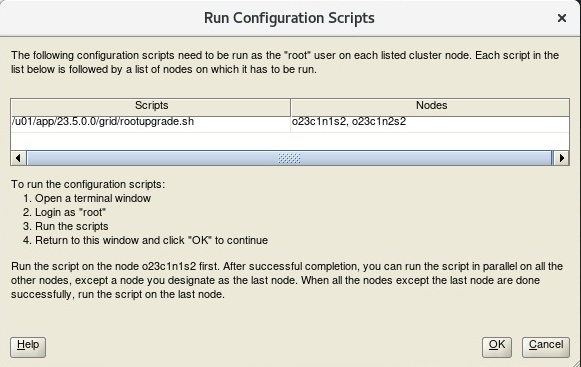
So, with root you call in the first node (where +ASM1 is running), and later in the rest of the nodes (just remember to stop any databases ruining in the node before calling the script – you can relocate services to others nodes and no connection error appears at application side). The output below was cropped to reduce the size of the post, but you can see that:
[root@o23c1n1s2 ~]# /u01/app/23.5.0.0/grid/rootupgrade.sh
Performing root user operation.

The following environment variables are set as:
    ORACLE_OWNER= grid
    ORACLE_HOME=  /u01/app/23.5.0.0/grid

Enter the full pathname of the local bin directory: [/usr/local/bin]:
The contents of "dbhome" have not changed. No need to overwrite.
The file "oraenv" already exists in /usr/local/bin.  Overwrite it? (y/n)
[n]: y
   Copying oraenv to /usr/local/bin ...
The file "coraenv" already exists in /usr/local/bin.  Overwrite it? (y/n)
[n]: y
   Copying coraenv to /usr/local/bin ...

Entries will be added to the /etc/oratab file as needed by
Database Configuration Assistant when a database is created
Finished running generic part of root script.
Now product-specific root actions will be performed.
RAC option enabled on: Linux
Executing command '/u01/app/23.5.0.0/grid/perl/bin/perl -I/u01/app/23.5.0.0/grid/perl/lib -I/u01/app/23.5.0.0/grid/crs/install /u01/app/23.5.0.0/grid/crs/install/rootcrs.pl  -upgrade'
Using configuration parameter file: /u01/app/23.5.0.0/grid/crs/install/crsconfig_params
The log of current session can be found at:
  /u01/app/grid/crsdata/o23c1n1s2/crsconfig/crsupgrade_o23c1n1s2_2024-07-26_10-10-21PM.log
2024/07/26 22:10:44 CLSRSC-595: Executing upgrade step 1 of 17: 'UpgradeTFA'.
2024/07/26 22:10:44 CLSRSC-4015: Performing install or upgrade action for Oracle Autonomous Health Framework (AHF).
2024/07/26 22:10:44 CLSRSC-4012: Shutting down Oracle Autonomous Health Framework (AHF).
2024/07/26 22:11:09 CLSRSC-4013: Successfully shut down Oracle Autonomous Health Framework (AHF).
2024/07/26 22:11:09 CLSRSC-595: Executing upgrade step 2 of 17: 'ValidateEnv'.
2024/07/26 22:11:13 CLSRSC-595: Executing upgrade step 3 of 17: 'GetOldConfig'.
...
2024/07/26 22:15:24 CLSRSC-595: Executing upgrade step 6 of 17: 'PreUpgrade'.
2024/07/26 22:15:31 CLSRSC-486:
 At this stage of upgrade, the OCR has changed.
 Any attempt to downgrade the cluster after this point will require a complete cluster outage to restore the OCR.
2024/07/26 22:15:31 CLSRSC-541:
 To downgrade the cluster:
 1. All nodes that have been upgraded must be downgraded.
2024/07/26 22:15:31 CLSRSC-542:
 2. Before downgrading the last node, the Grid Infrastructure stack on all other cluster nodes must be down.
2024/07/26 22:15:34 CLSRSC-468: Setting Oracle Clusterware and ASM to rolling migration mode
2024/07/26 22:15:34 CLSRSC-482: Running command: '/u01/app/19.23.0.0/grid/bin/crsctl start rollingupgrade 23.0.0.0.0'
CRS-1131: The cluster was successfully set to rolling upgrade mode.
2024/07/26 22:15:39 CLSRSC-482: Running command: '/u01/app/23.5.0.0/grid/bin/asmca -silent -upgradeNodeASM -nonRolling false -oldCRSHome /u01/app/19.23.0.0/grid -oldCRSVersion 19.0.0.0.0 -firstNode true -startRolling false '
2024/07/26 22:15:48 CLSRSC-469: Successfully set Oracle Clusterware and ASM to rolling migration mode
2024/07/26 22:15:52 CLSRSC-466: Starting shutdown of the current Oracle Grid Infrastructure stack
2024/07/26 22:16:25 CLSRSC-467: Shutdown of the current Oracle Grid Infrastructure stack has successfully completed.
...
2024/07/26 22:20:49 CLSRSC-475: Upgrade of resource types successfully initiated.
2024/07/26 22:20:51 CLSRSC-595: Executing upgrade step 17 of 17: 'PostUpgrade'.
2024/07/26 22:21:05 CLSRSC-325: Configure Oracle Grid Infrastructure for a Cluster ... succeeded
[root@o23c1n1s2 ~]#
Since the first node was fine, no errors, we can call the second node:
[root@o23c1n2s2 ~]# /u01/app/23.5.0.0/grid/rootupgrade.sh
Performing root user operation.

The following environment variables are set as:
    ORACLE_OWNER= grid
    ORACLE_HOME=  /u01/app/23.5.0.0/grid

Enter the full pathname of the local bin directory: [/usr/local/bin]:
The contents of "dbhome" have not changed. No need to overwrite.
The file "oraenv" already exists in /usr/local/bin.  Overwrite it? (y/n)
[n]: y
   Copying oraenv to /usr/local/bin ...
The file "coraenv" already exists in /usr/local/bin.  Overwrite it? (y/n)
[n]: y
   Copying coraenv to /usr/local/bin ...

Entries will be added to the /etc/oratab file as needed by
Database Configuration Assistant when a database is created
Finished running generic part of root script.
Now product-specific root actions will be performed.
RAC option enabled on: Linux
Executing command '/u01/app/23.5.0.0/grid/perl/bin/perl -I/u01/app/23.5.0.0/grid/perl/lib -I/u01/app/23.5.0.0/grid/crs/install /u01/app/23.5.0.0/grid/crs/install/rootcrs.pl  -upgrade'
Using configuration parameter file: /u01/app/23.5.0.0/grid/crs/install/crsconfig_params
The log of current session can be found at:
  /u01/app/grid/crsdata/o23c1n2s2/crsconfig/crsupgrade_o23c1n2s2_2024-07-26_10-39-10PM.log
2024/07/26 22:39:20 CLSRSC-595: Executing upgrade step 1 of 17: 'UpgradeTFA'.
2024/07/26 22:39:20 CLSRSC-4015: Performing install or upgrade action for Oracle Autonomous Health Framework (AHF).
…
2024/07/26 22:43:48 CLSRSC-343: Successfully started Oracle Clusterware stack
clscfg: EXISTING configuration version 23 detected.
Successfully taken the backup of node specific configuration in OCR.
Successfully accumulated necessary OCR keys.
Creating OCR keys for user 'root', privgrp 'root'..
Operation successful.
2024/07/26 22:44:07 CLSRSC-595: Executing upgrade step 16 of 17: 'UpgradeNode'.
Start upgrade invoked..
2024/07/26 22:44:19 CLSRSC-478: Setting Oracle Clusterware active version on the last node to be upgraded
2024/07/26 22:44:19 CLSRSC-482: Running command: '/u01/app/23.5.0.0/grid/bin/crsctl set crs activeversion'
Started to upgrade the active version of Oracle Clusterware. This operation may take a few minutes.
Started to upgrade CSS.
CSS was successfully upgraded.
Started to upgrade Oracle ASM.
Started to upgrade CRS.
CRS was successfully upgraded.
…
2024/07/26 22:46:45 CLSRSC-325: Configure Oracle Grid Infrastructure for a Cluster ... succeeded
[root@o23c1n2s2 ~]#
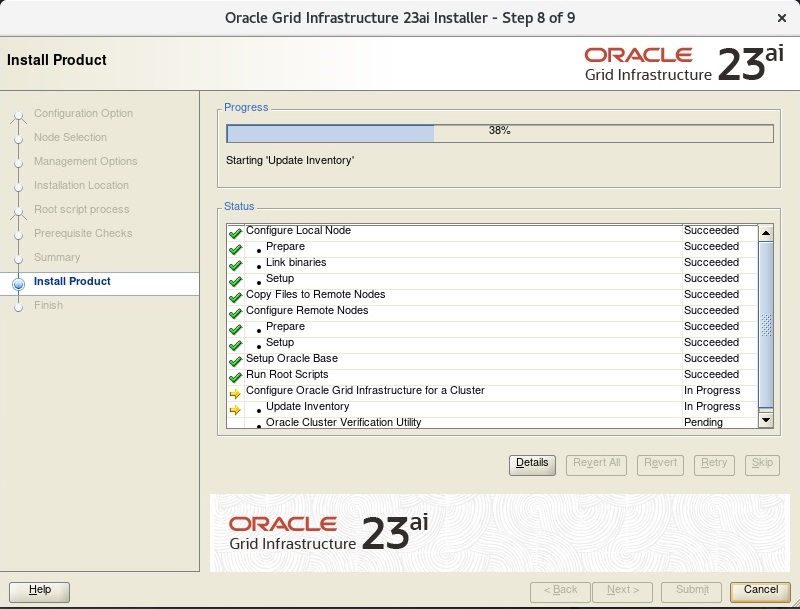
After that, we can click OK at the GIU and finish the installation:
Post Upgrade
After finishing the upgrade you can go and fix the bash_profile (in case you use it), to point to the new GI Home path. Below you can see that I changed the ORACLE_HOME variable to the new path:
[root@o23c1n1s2 ~]# su - grid
[grid@o23c1n1s2 ~]$ cat .bash_profile
# .bash_profile

# Get the aliases and functions
if [ -f ~/.bashrc ]; then
        . ~/.bashrc
fi

# User specific environment and startup programs

ORACLE_HOME=/u01/app/19.23.0.0/grid
ORACLE_BASE=/u01/app/grid
ORACLE_SID=+ASM1
PATH=$ORACLE_HOME/bin:$PATH
umask 022

export ORACLE_HOME
export ORACLE_BASE
export ORACLE_SID

PATH=$PATH:$HOME/.local/bin:$HOME/bin

export PATH
[grid@o23c1n1s2 ~]$
[grid@o23c1n1s2 ~]$
[grid@o23c1n1s2 ~]$ vi .bash_profile
[grid@o23c1n1s2 ~]$
[grid@o23c1n1s2 ~]$
[grid@o23c1n1s2 ~]$ cat .bash_profile
# .bash_profile

# Get the aliases and functions
if [ -f ~/.bashrc ]; then
        . ~/.bashrc
fi

# User specific environment and startup programs

ORACLE_HOME=/u01/app/23.5.0.0/grid
ORACLE_BASE=/u01/app/grid
ORACLE_SID=+ASM1
PATH=$ORACLE_HOME/bin:$PATH
umask 022

export ORACLE_HOME
export ORACLE_BASE
export ORACLE_SID

PATH=$PATH:$HOME/.local/bin:$HOME/bin

export PATH
[grid@o23c1n1s2 ~]$
After I made the same at the rest of the nodes of the cluster.
And you can see, now, logging in I already start to use the 23.5 version:
[root@o23c1n1s2 ~]# su - grid
[grid@o23c1n1s2 ~]$ sqlplus / as sysasm

SQL*Plus: Release 23.0.0.0.0 - for Oracle Cloud and Engineered Systems on Fri Jul 26 23:42:19 2024
Version 23.5.0.24.07

Copyright (c) 1982, 2024, Oracle.  All rights reserved.


Connected to:
Oracle Database 23ai Enterprise Edition Release 23.0.0.0.0 - for Oracle Cloud and Engineered Systems
Version 23.5.0.24.07

SQL> exit
Disconnected from Oracle Database 23ai Enterprise Edition Release 23.0.0.0.0 - for Oracle Cloud and Engineered Systems
Version 23.5.0.24.07
[grid@o23c1n1s2 ~]$
Summary. The Upgrade Process
As you can above, the steps are quite simple, we check and meet the requirements, call the GUI to install, and upgrade it. The 23ai follows the same process standardized with the 19c.
When the on-prem (non-Engineered System) is released, I will create a dedicated post about it, to mention more details that do not exist for Exadata (like ASM FIlter – AFD). There are several details linked to the Linux kernel to be used, UDEV, and CPU usage.
Disclaimer: “The postings on this site are my own and don’t necessarily represent my actual employer positions, strategies, or opinions. The information here was edited to be useful for general purposes, and specific data and identifications were removed to allow reach the generic audience and to be useful for the community. Post protected by copyright.”
Pingback: ExaCC, Upgrading from OEL 7 to OEL 8 - Fernando Simon
Pingback: Install Oracle 23ai ASM on Linux from Exadata Sources – usn-it.de
Pingback: ASMCA_ARGS - Fernando Simon